Lab 1: Create an Azure App Service resource by using a Docker container image
Task 1: Open the Azure portal
On the taskbar, select the Microsoft Edge icon.
In the browser window that opens, browse to the Azure portal (portal.azure.com), and then sign in with the account you'll be using for this lab.
Note: If this is your first time signing in to the Azure portal, you'll be offered a tour of the portal. Select Get Started to skip the tour and begin using the portal.
Task 2: Create a web app by using Azure App Service resource by using an httpbin container image
In the Azure portal, use the Search resources, services, and docs text box to search for App Services and, in the list of results, select App Services.
On the App Services blade, select + Create.
On the Create Web App blade, on the Basics tab, perform the following actions:
| Setting | Action | | -- | -- | | Subscription drop-down list | Retain the default value | | Resource group section | Select Create new, enter ApiService, and then select OK | | Name text box | Enter httpapi [yourname] | | Publish section | Select Docker Container | | Operating System section | Select Linux | | Region drop-down list | Select any Azure region in which you can deploy an Azure web app | | Linux Plan section | Select Create new, enter the value ApiPlan in the Name text box, and then select OK | | Pricing plan section | Select Change size, on the Spec Picker blade, select See additional options, select S1, and then select Apply |
Select Next: Docker >.
On the Docker tab, perform the following actions, and then select Review + create:
| Setting | Action | | -- | -- | | Options drop-down list | Select Single Container | | Image Source drop-down list | Select Docker Hub | | Access Type drop-down list | Select Public | | Image and tag text box | Enter kennethreitz/httpbin:latest |
On the Review + create tab, review the options that you selected during the previous steps.
Select Create to create the web app by using your specified configuration.
Note: Wait for the creation task to complete before you proceed with this lab.
Task 3: Test the httpbin web application
In the Azure portal, use the Search resources, services, and docs text box to search for App Services and, in the list of results, select App Services.
On the App Services blade, select the newly created web app.
On the blade displaying the newly created app properties, select Browse.
Within the web application, perform the following actions:
a. Select Response formats.
b. Select GET /html.
c. Select Try it out.
The following screenshot displays the Try it out section of the web application.

d. Select Execute.
e. Review the value of the Response body and Response headers text boxes.
f. Review the value of the Request URL text box.
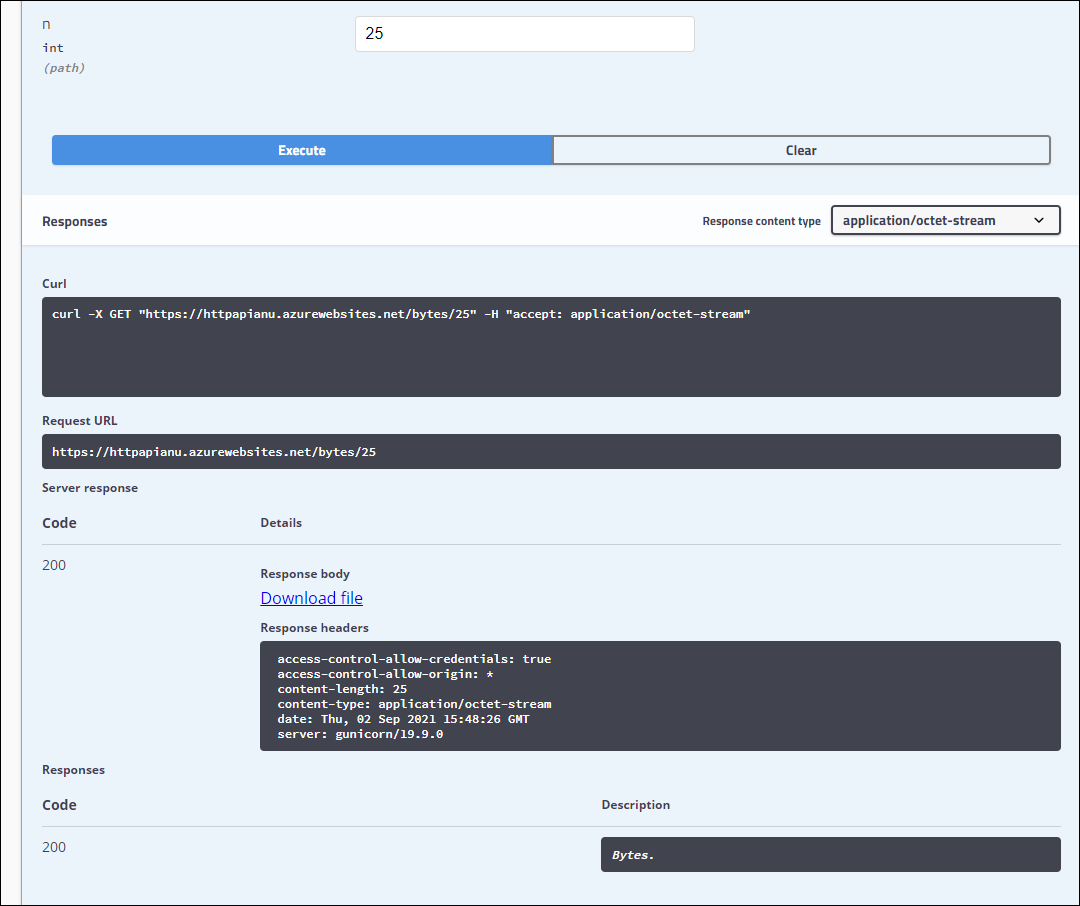
Within the web application, perform the following actions:
a. Select Dynamic data.
b. Select GET /bytes/{n}.
c. Select Try it out.
d. In the n text box, enter 25.
e. Select Execute.
f. Review the value of the Response body and Response headers text boxes.
g. Select Download file, and after the file downloads, open it in Notepad, review its content, and then close it.
Note: The file contains a sequence of randomly generated bytes.
The following screenshot displays the dynamic data section of the web application.
Within the web application, perform the following actions:
a. Select Status codes.
b. Select GET /status/{codes}.
c. Select Try it out.
d. In the codes text box, enter 404.
e. Select Execute.
f. Review the Server response and note that it includes Error: NOT FOUND entry.
Close the browser window that displays the web application.
Switch back to the browser window that displays the httpapi[yourname] web app.
In the Settings section, select the Properties link.
In the Properties section, record the value of the URL link. You'll use this value later in the lab to send requests to the corresponding API.
Review
In this exercise, you created a new Azure web app by using a container image sourced from Docker Hub.