Lab 4: Application Insights logging with .NET
Task 1: Configure logging for a .NET API app
Switch to the Visual Studio Code window.
At the terminal prompt, run the following command to set the current directory to the $HOME\training-az204\Labs\11\Starter\Api, where the deployment files reside:
cd $HOME\training-az204\Labs\11\Starter\ApiRun the following command to import version 2.20.0 of Microsoft.Extensions.Logging.ApplicationInsights from NuGet to the current project:
dotnet add package Microsoft.Extensions.Logging.ApplicationInsights --version 2.20.0Note: The dotnet add package command will add the Microsoft.ApplicationInsights package from NuGet. For more information, refer to Microsoft.Extensions.Logging.ApplicationInsights.
In the Visual Studio Code window, in the Explorer pane, navigate to the Controllers folder, and then open the file WeatherForecastController.cs.
Review the content of the file and note that it includes a constructor injection for the generic ILogger
interface. using Microsoft.AspNetCore.Mvc; namespace SimpleApi.Controllers; [ApiController] [Route("[controller]")] public class WeatherForecastController : ControllerBase { private static readonly string[] Summaries = new[] { "Freezing", "Bracing", "Chilly", "Cool", "Mild", "Warm", "Balmy", "Hot", "Sweltering", "Scorching" }; private readonly ILogger<WeatherForecastController> _logger; public WeatherForecastController(ILogger<WeatherForecastController> logger) { _logger = logger; } [HttpGet(Name = "GetWeatherForecast")] public IEnumerable<WeatherForecast> Get() { return Enumerable.Range(1, 5).Select(index => new WeatherForecast { Date = DateTime.Now.AddDays(index), TemperatureC = Random.Shared.Next(-20, 55), Summary = Summaries[Random.Shared.Next(Summaries.Length)] }) .ToArray(); } }Note: You'll leverage this configuration to implement custom logging. Currently, the constructor displays a group of five randomly generated weather forecasts. You'll modify the controller to display one forecast at a time. For each forecast, you'll generate an informational, warning, or error log entry indicating the type of weather (mild, severe, and extreme). After these log entries are recorded by Application Insights in the corresponding Log Analytics workspace, each entry will have an automatically assigned severity level of 1, 2, or 3.
Replace the definition of the
public IEnumerable<WeatherForecast> Get()method in the file WeatherForecastController.cs with the following content:{ var rng = new Random(); int temperatureC = rng.Next(-20, 55); var summaryId = rng.Next(Summaries.Length); switch (summaryId) { case 0: case 9: _logger.LogError("WeatherForecast: extreme weather"); break; case 1: case 2: case 7: case 8: _logger.LogWarning("WeatherForecast: severe weather"); break; default: _logger.LogInformation("WeatherForecast: mild weather"); break; } return Enumerable.Range(1, 1).Select(index => new WeatherForecast { Date = DateTime.Now.AddDays(index), TemperatureC = temperatureC, Summary = Summaries[summaryId] }) .ToArray(); }Save and close the file.
At the terminal prompt, run the following command to build the .NET Web API:
dotnet build
Task 2: Test logging of a .NET Core API app
Run the following command to launch the .NET Web API.
dotnet runNote: Keep the web API running and monitor the output of the Visual Studio Code terminal pane as you perform the next steps in this task.
Review the output of the command and note the HTTPS URL that the site is listening on.
From the taskbar, open the context menu for the Microsoft Edge icon, and then open a new browser window.
Note: Position the browser window such that it doesn't block the Visual Studio Code terminal pane.
In the browser window that opens, navigate to the URL you identified and add the /weatherforecast relative path of your web API and then refresh the page several times.
Note: The full URL is
http://localhost:[port-number]/weatherforecast, where the[port-number]placeholder identifies the port number at which the web app is accessible via the HTTPS protocol.Note: Each time you refresh the page, it should display a different weather forecast in the following format.
[{"date":"2021-09-04T14:35:29.0789168-07:00","temperatureC":2,"temperatureF":35,"summary":"Sweltering"}]Note: Each refresh of the page should result in an informational, warning, or error message display at the terminal prompt, in the following format:
warn: SimpleApi.Controllers.WeatherForecastController[0] WeatherForecast: severe weatherNote: Refresh the page several times to ensure that you generated at least one message of each type (info, warn, and fail).
Leave the API app running.
Task 3: Review the Application Insights logging
On your lab computer, switch to the Microsoft Edge browser window displaying the Azure portal.
In the Azure portal, navigate back to the blade of the instrm[yourname] Application Insights resource you created previously in this lab.
On the Application Insights blade, in the Monitoring section, select Logs.
If needed, close the Welcome to Log Analytics pane and Queries pane.
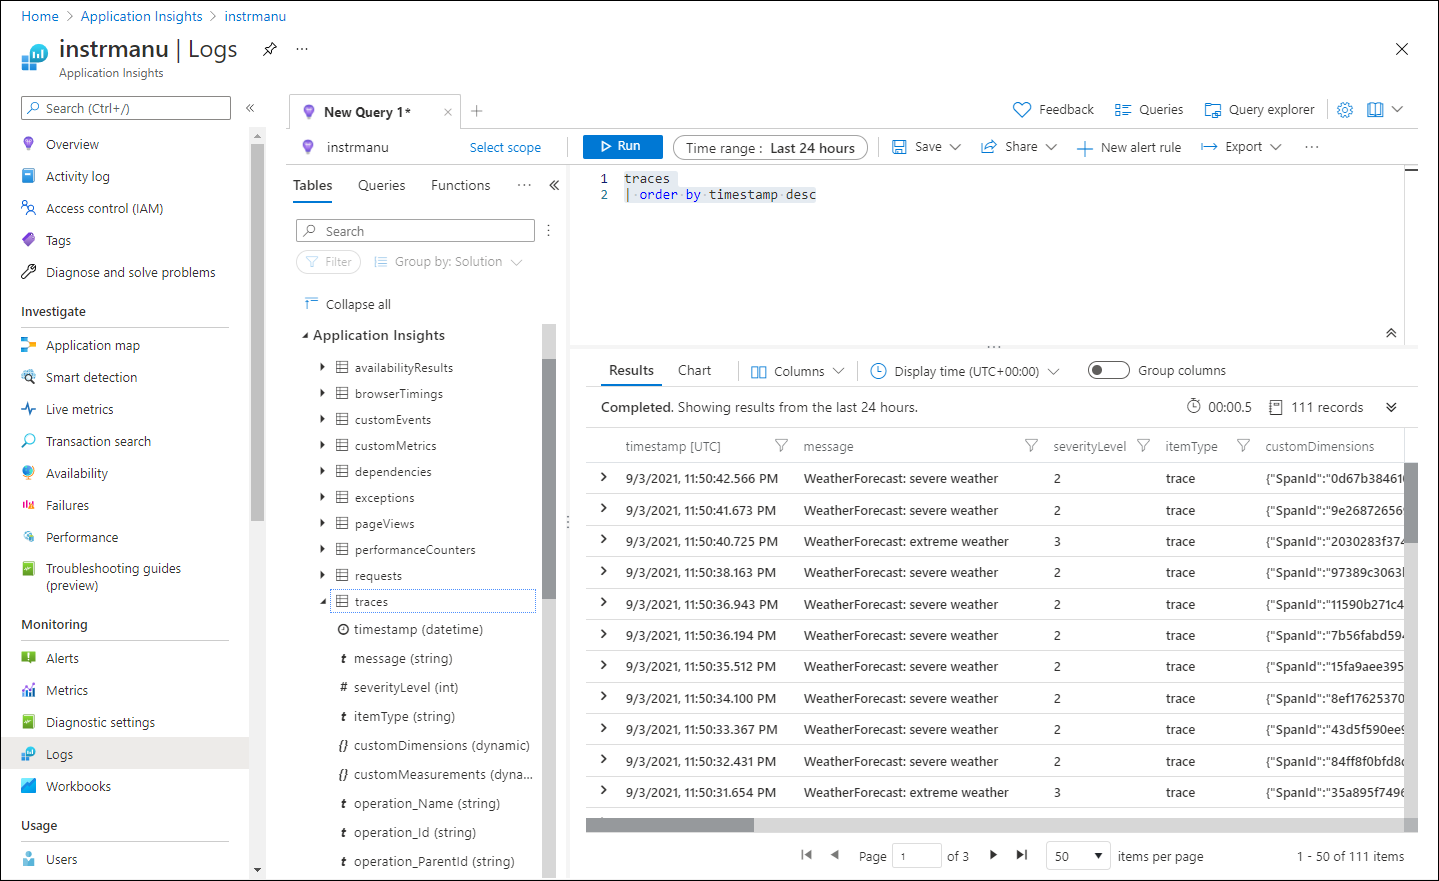
In the New Query pane, type the following query and select Run:
traces
| order by timestamp desc
Review the results of the query.
Note: The results should include log entries corresponding to the warning and error messages generated by the .NET Core api app, with their respective severity levels (2 and 3).
Note: It can take up to five minutes to observe requests in the Application Insights metrics charts.
The following screenshot displays the log query results on the Application Insights Logs blade.
Note: You could deploy the updated API app to an Azure web app to collect its logs using Application Insights in an equivalent manner.
Note: You can extend the Application Insights logging level to include informational events by modifying the appsettings.Development.json (or appsettings.json) file as illustrated in the following code listing. However, you should keep in mind that this will considerably increase the log volume, which has potential network performance and pricing implications:
{
  "Logging": {
    "LogLevel": {
      "Default": "Information",
      "Microsoft": "Warning",
      "Microsoft.Hosting.Lifetime": "Information"
    },
    "ApplicationInsights": {
      "LogLevel": {
        "Microsoft": "Information"
      }
    }
  }
}
Close the browser window displaying the output of your API app.
Switch to the Visual Studio Code window, and then select Kill Terminal (the Recycle Bin icon) to close the terminal pane and any associated processes.
Review
In this exercise, you configured and tested Application Insights logging of your web API app.