Lab 3: Monitor a web API using Application Insights
Task 1: Deploy an application to the web API
On the lab computer, switch to the Visual Studio Code.
In the Visual Studio Code window, in the Explorer pane, navigate to the bin\Debug\net6.0 directory.
Note: To verify that you are in the bin\Debug\net6.0 directory, in Visual Studio Code, on the File menu, select Open Folder and browse to $HOME\training-az204\Labs\11\Starter\Api\bin\Debug\net6.0, and then select Select Folder.
Add a file named web.config to the directory.
Open the web.config file and add the following content:
<?xml version="1.0" encoding="utf-8"?>
<configuration>
  <location path="." inheritInChildApplications="false">
    <system.webServer>
      <handlers>
        <add name="aspNetCore" path="*" verb="*" modules="AspNetCoreModuleV2" resourceType="Unspecified" />
      </handlers>
      <aspNetCore processPath="dotnet" arguments=".\SimpleApi.dll" stdoutLogEnabled="false" stdoutLogFile=".\logs\stdout" hostingModel="inprocess" />
    </system.webServer>
  </location>
</configuration>
Save and close the file.
In the Visual Studio Code window, activate the shortcut menu, and then select Open in Integrated Terminal.
At the terminal prompt, run the following command to ensure that the current directory is set to the $HOME\training-az204\Labs\11\Starter\Api\bin\Debug\net6.0, where the deployment files reside:
cd $HOME\training-az204\Labs\11\Starter\Api\bin\Debug\net6.0Run the following command to create a zip file containing the starter project that you'll deploy next to the Azure web API:
Compress-Archive -Path * -DestinationPath api.zipAt the terminal prompt, run the following command to sign in to your Azure subscription by using Azure PowerShell:
Connect-AzAccountFollow the instructions displayed at the terminal prompt by switching to the Microsoft Edge browser displaying the Azure portal, opening another tab in the browser window, navigating to
https://microsoft.com/devicelogin, when prompted, entering the provided code, and then signing in with the account you'll be using for this lab.Note: Wait for the sign-in process to complete.
Close the newly opened browser tab and switch back to the terminal prompt in the Visual Studio Code window.
Run the following command to display the listing of all web apps in the MonitoredAssets resource group:
Get-AzWebApp -ResourceGroupName MonitoredAssetsRun the following command to display the list of web apps in the MonitoredAssets resource group, which names start with smpapi*:
Get-AzWebApp -ResourceGroupName MonitoredAssets | Where-Object {$_.Name -like 'smpapi*'}Run the following commands to display the name of the first of the web apps identified in the previous step and store it in a variable named $webAppName:
Get-AzWebApp -ResourceGroupName MonitoredAssets | Where-Object {$_.Name -like 'smpapi*'} | Select-Object -ExpandProperty Name
$webAppName = (Get-AzWebApp -ResourceGroupName MonitoredAssets | Where-Object {$_.Name -like 'smpapi*'})[0] | Select-Object -ExpandProperty Name
Run the following command to deploy the api.zip file you created previously in this task to the web API whose name you identified in the previous step, select Y when prompted by the command:
Publish-AzWebApp -ResourceGroupName MonitoredAssets -Name $webAppName -ArchivePath "$HOME\training-az204\Labs\11\Starter\Api\bin\Debug\net6.0\api.zip"Note: Wait for the deployment to complete before you continue with this lab.
On the lab computer, launch another Microsoft Edge browser window.
In the browser window, navigate to the Azure Web API app into which you deployed the API app previously in this task by appending to its URL (that you recorded previously in this lab) the suffix /weatherforecast.
Note: For example, if your URL is
https://smpapianu.azurewebsites.net, the new URL would behttps://smpapianu.azurewebsites.net/weatherforecast.Verify that the output resembles the one generated when running the API app locally.
Note: The output will include different values but it should have the same format.
Note: If you are getting an exception, make sure the contents of the web.config file matches the sample shown earlier in this task. If it does not match, make any necessary changes and regenerate the api.zip file and re-deploy.
Task 2: Configure in-depth metric collection for Web Apps
On your lab computer, switch to the Microsoft Edge browser window displaying the Azure portal.
In the Azure portal, navigate back to the blade of the smpapi[yourname] web app resource you created previously in this lab.
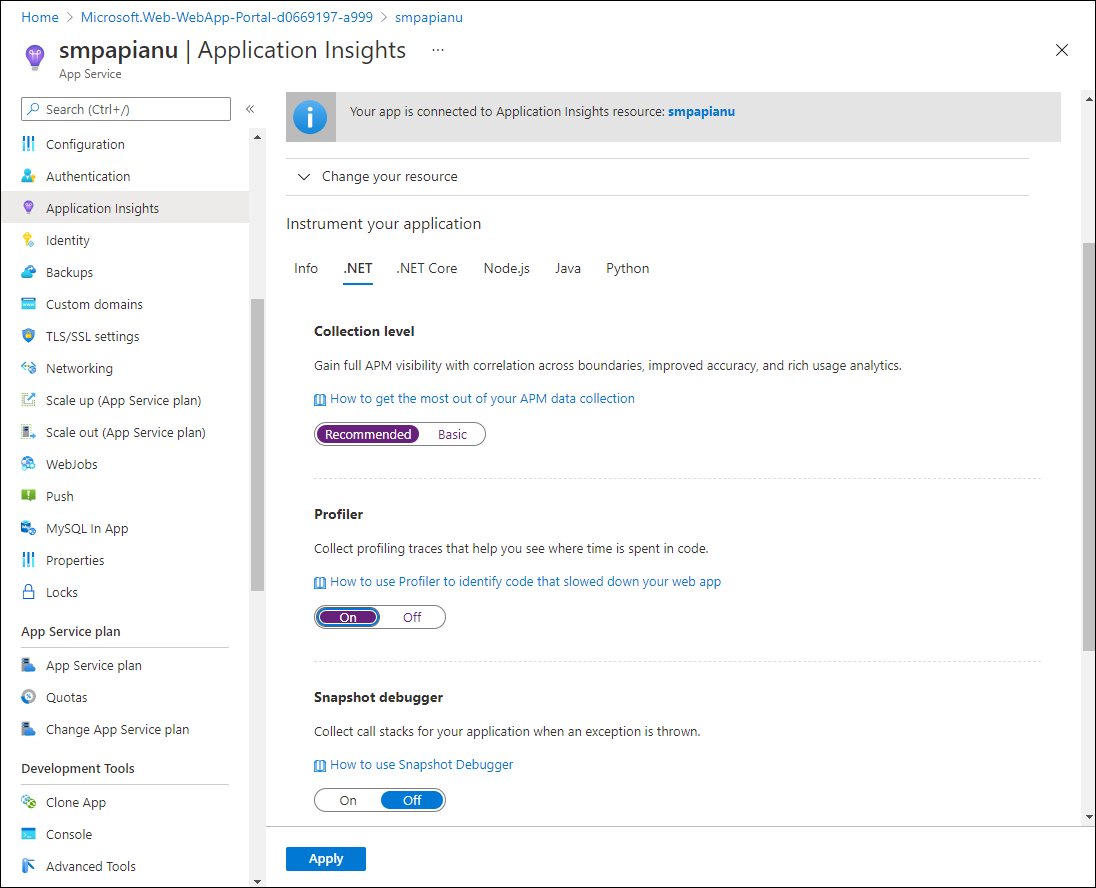
On the App Service blade, select Application Insights.
On the Application Insights blade, perform the following actions, select Apply, and then in the confirmation dialog, select Yes:
| Setting | Action | | -- | -- | | Application Insights slider | Ensure it is set to Enable | | Instrument your application section | Select the .NET tab | | Collection level section | Select Recommended | | Profiler section | Select On | | Snapshot debugger section | Select Off | | SQL Commands section | Select Off |
The following screenshot displays the **Application Insights** settings of the Azure Web API.
Switch to the browser tab you opened in the previous task to display the results of deployment of your API app to the target Azure API app (including the /weatherforecast relative path in the target URL) and refresh the browser page several times.
Review the JSON-formatted output generated by the API.
Record the URL that you used to access the JSON-formatted output.
Note: The URL should be in the format
https://smpapianu.azurewebsites.net/weatherforecastif smpapianu was the site name you created earlier.
Task 3: Get updated metrics in Application Insights
Return to the browser window displaying the Azure web app in the Azure portal.
On the Application Insights blade of the web app, select the View Application Insights data link.
On the Application Insights blade, review the collected metrics in the tiles in the center of the blade, including the number of server requests that have occurred and the average server response time.
The following screenshot displays the Application Insights metrics of the Azure web app in the Azure portal.
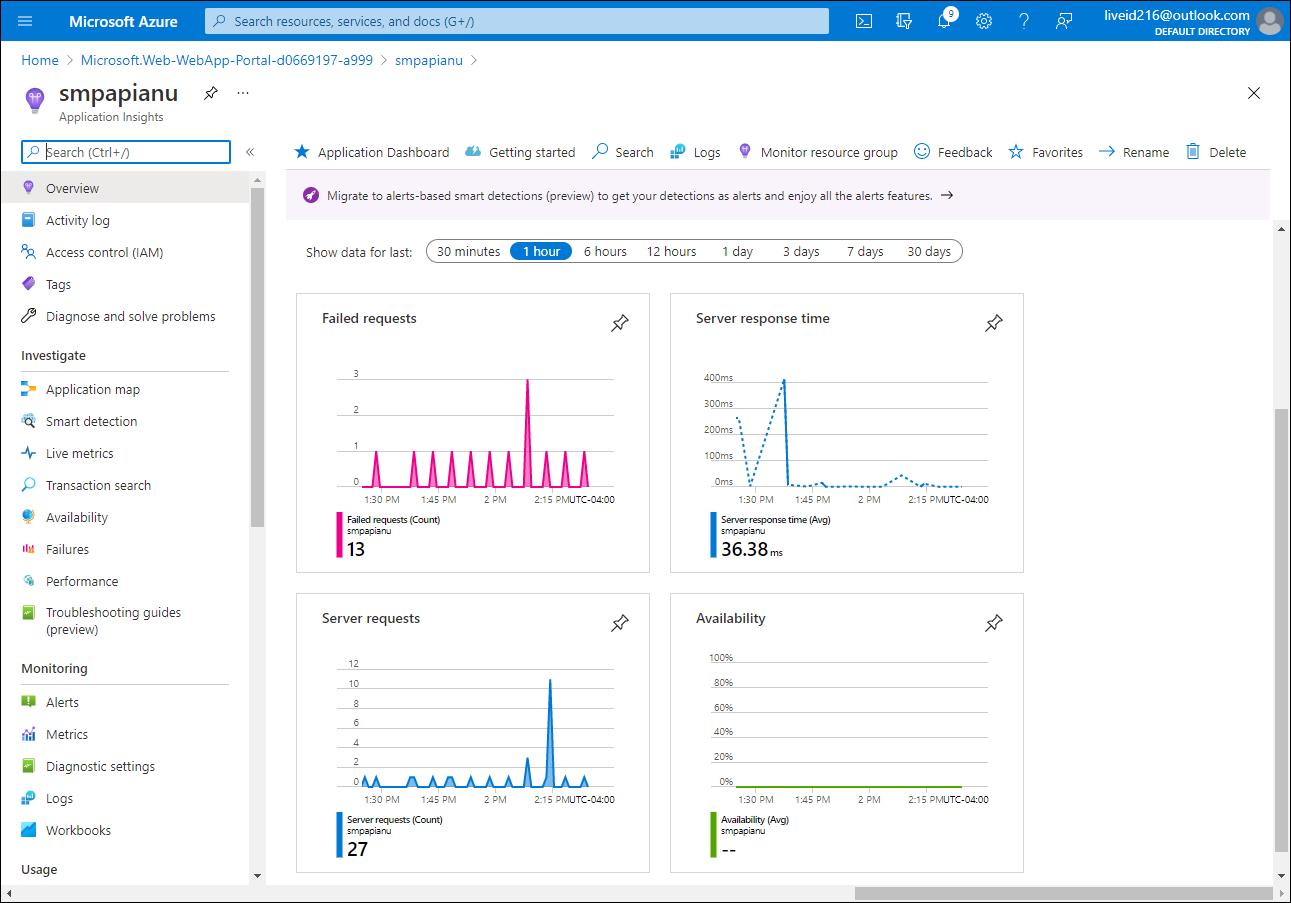
Note: It can take up to five minutes for updated metrics to appear in the Application Insights metrics charts.
Task 4: View real-time metrics in Application Insights
On the Application Insights blade, in the Investigate section, select Live metrics.
Switch back to the browser window displaying the target API app running in the target Azure web app (which targets the /weatherforecast relative path in the target URL), and then refresh the browser page several times.
Switch to the browser window displaying the Live metrics blade and review its content.
Note: The Incoming Requests section should update within seconds, showing the requests that you made to the web API.