Lab 1: Create Azure resources
Task 1: Open the Azure portal
On the taskbar, select the Microsoft Edge icon.
In the open browser window, browse to the Azure portal (https://portal.azure.com), and then sign in with the account you'll be using for this lab.
Note: If this is your first time signing in to the Azure portal, you'll be offered a tour of the portal. Select Get Started to skip the tour and begin using the portal.
Task 2: Create a Storage account
In the Azure portal, use the Search resources, services, and docs text box to search for Storage Accounts, and then in the list of results, select Storage accounts.
On the Storage accounts blade, select + Create.
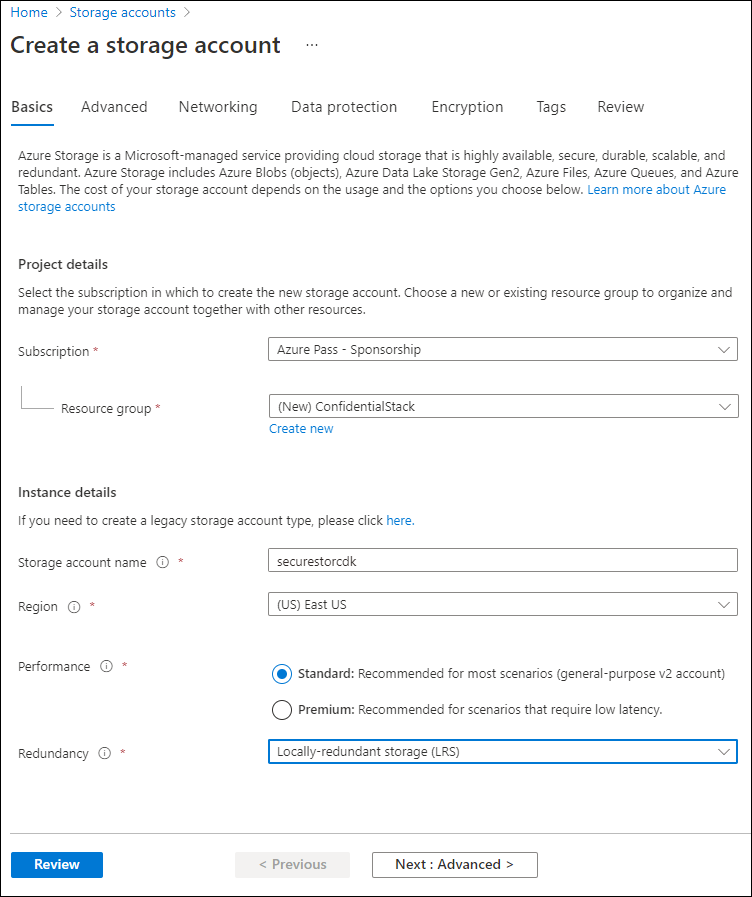
On the Create a storage account blade, on the Basics tab, perform the following actions, and select Review:
| Setting | Action | | -- | -- | | Subscription drop-down list | Retain the default value | | Resource group section | Select Create new, enter ConfidentialStack, and then select OK | | Storage account name text box | Enter securestor[yourname] | | Region drop-down list | Select (US) East US | | Performance section | Select the Standard option | | Redundancy drop-down list | Select Locally-redundant storage (LRS) |
The following screenshot displays the configured settings on the Create a storage account blade.
On the Review tab, review the options that you selected during the previous steps.
Select Create to create the storage account by using your specified configuration.
Note: Wait for the creation task to complete before you move forward with this lab.
On the Deployment Overview blade, select Go to resource.
On the Storage account blade, in the Security + networking section, select the Access keys link.
In the Access keys section, select Show keys.
Select any one of the keys and record the value in either of the Connection string boxes. You'll use this value later in this lab.
Note: It doesn't matter which connection string you choose. They're interchangeable.
Task 3: Create an Azure Key Vault
In the Azure portal, use the Search resources, services, and docs text box to search for Key vaults, and then in the list of results, select Key vaults.
On the Key vaults blade, select Create.
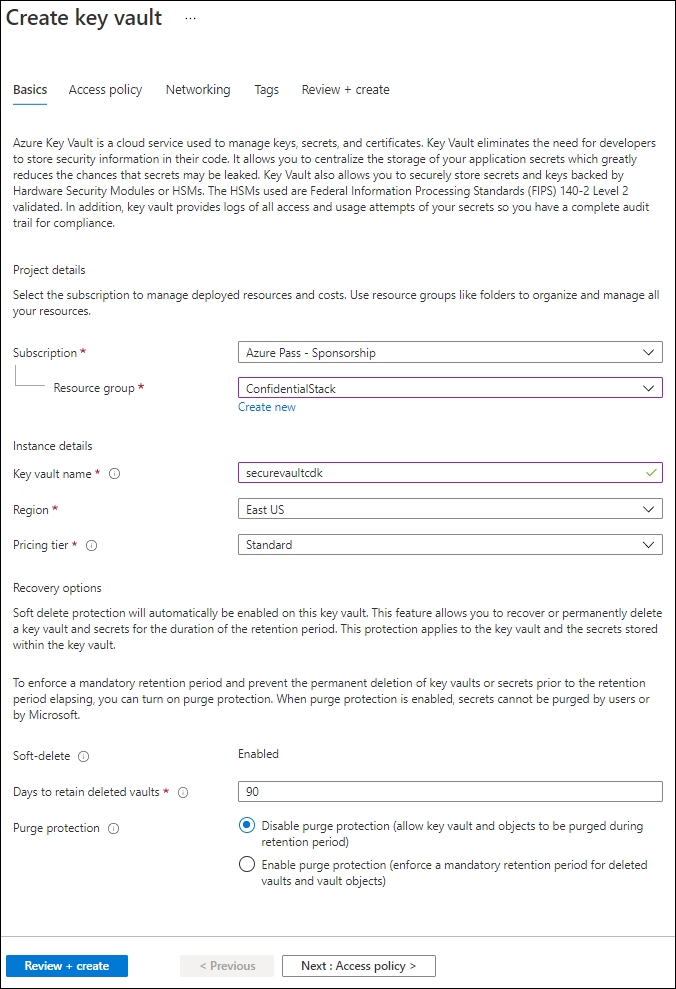
On the Create key vault blade, on the Basics tab, perform the following actions, and then select Review + create:
| Setting | Action | | -- | -- | | Subscription drop-down list | Retain the default value | | Resource group drop-down list | Select ConfidentialStack in the list | | Key vault name text box | Enter securevault[yourname] | | Region drop-down list | Select East US | | Pricing tier drop-down list | Select Standard |
The following screenshot displays the configured settings on the Create key vault blade.
On the Review + create tab, review the options that you selected during the previous steps.
Select Create to create the key vault by using your specified configuration.
Note: Wait for the creation task to complete before you move forward with this lab.
Task 4: Create a Function app
In the Azure portal, use the Search resources, services, and docs text box to search for Function App, and then in the list of results, select Function App.
On the Function App blade, select Create.
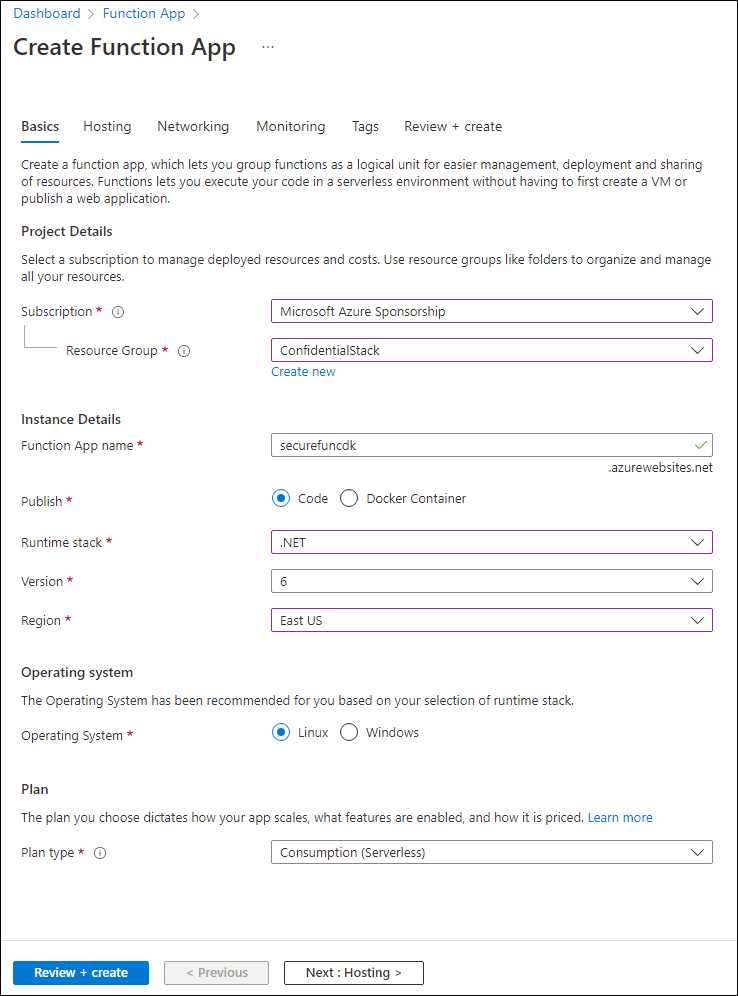
On the Create Function App blade, on the Basics tab, perform the following actions, and then select Next: Hosting:
| Setting | Action | | -- | -- | | Subscription drop-down list | Retain the default value | | Resource group drop-down list | Select ConfidentialStack | | Function App name text box | Enter securefunc[yourname] | | Publish section | Select Code | | Runtime stack drop-down list | Select .NET | | Version drop-down list | Select 6 | | Region drop-down list | Select the East US region | | Operating System section | Select Linux | | Plan type drop-down list | Select Consumption (Serverless) |
The following screenshot displays the configured settings in the Create Function App blade.
On the Hosting tab, perform the following actions, and then select Review + create:
| Setting | Action | | -- | -- | | Storage account drop-down list | Select the securestor[yourname] storage account |
On the Review + create tab, review the options that you selected during the previous steps.
Select Create to create the function app by using your specified configuration.
Note: Wait for the creation task to complete before you move forward with this lab.
Review
In this exercise, you created all the resources that you'll use in this lab.