Lab 3: Deploy an Azure container instance
Task 1: Enable the admin user in Container Registry
On the Azure portal's navigation pane, select the Resource groups link.
On the Resource groups blade, select the ContainerCompute resource group that you created previously in this lab.
On the ContainerCompute blade, select the container registry that you created previously in this lab, and then select Update.
On the Update container registry blade, in the Admin user section, select Enable.
Select Save, and then close the Update container registry blade.
Task 2: Automatically deploy a container image to an Azure container instance
On the Container Registry blade, in the Services section, select the Repositories link.
In the Repositories section, select the ipcheck container image repository.
On the Repository blade, select the ellipsis menu associated with the latest tag entry, and then select Run instance.
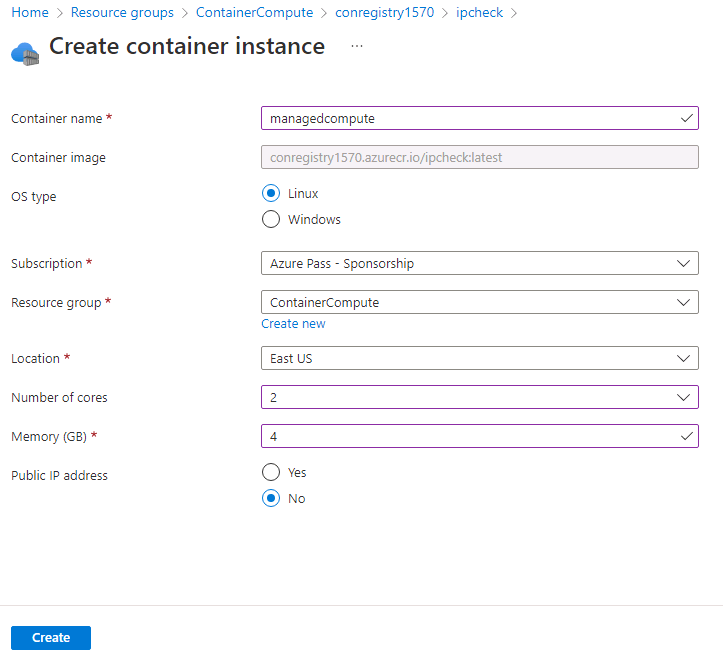
On the Create container instance blade, perform the following actions, and then select Create:
| Setting | Action | | -- | -- | | Container name text box | Enter managedcompute | | Container image text box | Retain the default value | | OS type section | Select Linux | | Subscription text box | Retain the default value | | Resource group drop-down list | Select ContainerCompute | | Location drop-down list | Select East US | | Number of cores drop-down list | Select 2 | | Memory (GB) text box | Enter 4 | | Public IP address section | Select No |
The following screenshot displays the configured settings on the Create container instance blade.
Note: Wait for the container instance to be created before you continue with this lab.
Task 3: Manually deploy a container image to Container Instances
On the Azure portal's navigation pane, select the Create a resource link.
On the Create a resource blade, in the Search services and marketplace text box, enter container instances, and then select Enter.
On the Marketplace search results blade, select the Container Instances result.
On the Container Instances blade, select Create.
On the Create Container Instance blade, on the Basics tab, perform the following actions, and then select Review + create:
| Setting | Action | | -- | -- | | Subscription drop-down list | Retain the default value | | Resource group drop-down list | Select ContainerCompute | | Container name text box | Enter manualcompute | | Region drop-down list | Select (US) East US | | Image source section | Select Azure Container Registry | | Registry drop-down list | Select the Azure Container Registry resource that you created previously in this lab | | Image drop-down list | Select ipcheck | | Image tag drop-down list | Select latest |
The following screenshot displays the configured settings on the Create container instance blade.

From the Review + create tab, review the selected options.
Select Create to create the container instance by using your specified configuration.
Note: Wait for the container instance to be created before you continue with this lab.
Task 4: Validate that the container instance ran successfully
On the Azure portal's navigation pane, select the Resource groups link.
On the Resource groups blade, select the ContainerCompute resource group that you created previously in this lab.
On the ContainerCompute blade, select the manualcompute container instance that you created previously in this lab.
On the Container Instances blade, in the Settings section, select the Containers link.
In the Containers section, review the list of Events.
Select the Logs tab, and then review the text logs from the container instance.
Note: You can also optionally find the Events and Logs from the managedcompute container instance.
Note: It is possible that manualcompute and managedcompute will not contain any events at this point.
Note: After the application finishes running, the container terminates because it has completed its work. For the manually created container instance, you indicated that a successful exit was acceptable, so the container ran once. The automatically created instance didn't offer this option, and it assumes the container should always be running, so you'll notice repeated restarts of the container.
Review
In this exercise, you used multiple methods to deploy a container image to an Azure container instance. By using the manual method, you were able to customize the deployment further and to run task-based applications as part of a container run.
Exercise 4: Clean up your subscription
Task 1: Open Azure Cloud Shell and list resource groups
In the Azure portal, select the Cloud Shell icon
 to open a new Bash session. If Cloud Shell defaults to a PowerShell session, select PowerShell, and then in the drop-down menu, select Bash.
Note: If this is the first time you're starting Cloud Shell, when prompted to select either Bash or PowerShell, select PowerShell. When you're presented with the You have no storage mounted message, select the subscription you're using in this lab, and then select Create storage.
Task 2: Delete resource groups
On the Cloud Shell pane, run the following command to delete the ContainerCompute resource group:
az group delete --name ContainerCompute --no-wait --yesNote: The command executes asynchronously (as determined by the --no-wait parameter), so while you'll be able to run another Azure CLI command immediately afterwards within the same Bash session, it'll take a few minutes before the resource groups are actually removed.
Close the Cloud Shell pane in the portal.
Task 3: Close the active applications
- Close the currently running Microsoft Edge application.
Review
In this exercise, you cleaned up your subscription by removing the resource groups used in this lab.